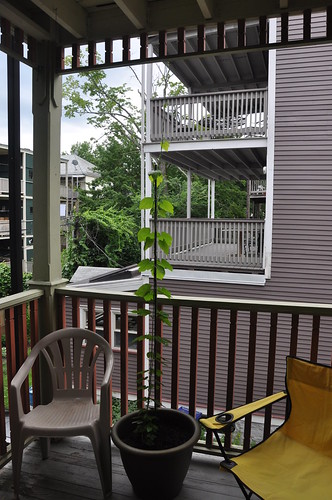
While living in a city definitely has it's ups for beer enthusiasts, the city home brewer is faced with a few more challenges than suburb dwellers. The biggest of these challenges is space - whether it's having to brew in the kitchen or find the environment to store and ferment beers, this is the biggest complaint I've heard from city home brewers. The other challenge is that most people in the city rent, which means there is a limited amount of work you can do to your unit or property. These same issues come up with trying to grow hops (and gardening in general, really). But if you have a back porch or small outdoor area that gets decent sunlight, a little ingenuity and a trip to the hardware store will get you a convenient set up.
The Hop Rhizome and Planting Environment
There are a large number of hop varieties that exist, and when it comes time to decide what you want to grow, you should consider your growing space and local climate. This was my first attempt at growing hops, and I knew I wanted something versatile, resilient, and relatively high-yielding. I purchased two Cascade rhizomes from Freshops.com, and they arrived in bubble wrap bags within a week.
Once I had the hop rhizomes, I took a trip to the local hardware store and purchased the following items for planting:
- 15" tall plastic planter
- organic potting soil w/ fertilizer
- 6 foot plastic stake
- gardening twine
There are plenty of resources on the web on how to plant the rhizome, but some important notes are 1) plant the rhizome with the shoots facing up, 2) plant it so the top is only a few inches below the surface of the soil, 3) make sure the soil is well aerated and can easily drain, and 4) plant the rhizome in early-mid Spring. Planting the rhizome is not difficult, and a big enough planter has plenty of room for the roots to establish.
Growing and Maintaining the Plant
It took almost two weeks for the first shoot to break the soil when I planted my Cascade rhizome. But once it was able to capture some sunlight, it took off. I used a plastic gardening stake as a means to hold a few strands of twine to create a small trellis. This should really be set up when you plant the rhizome so that no roots are damaged later on. Once the first hop shoot pops up, you want to slowly "train" the plant to grow up the twine. This won't be difficult to do, as the plant will hunt for something to grasp on to.
After a month the hops reached the top of the 6 foot stake and needed more room to grow. My solution was to tie a piece of twine from the top of our patio and let it hang down to the top of the stake. You can loop the twine throughout your patio or deck in a way that you'd like the hop to grow, although it will likely still take a bit of training.
Update: Here is the plant as of 7/10:
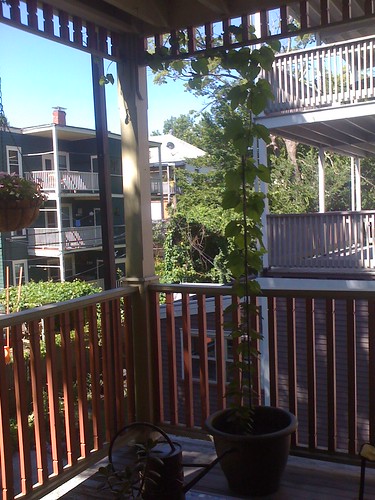
The Cascade hop rhizome has now grown to a plant that if laid out straight would be at least 15 feet tall. Smaller stems continue to expand out and off the main bine, which also is continuing to get thicker and sturdier. Once it comes time to harvest, I'll post up some more information on how successful I was.


No comments:
Post a Comment